
Making Copy Using Smartphone/Tablet (Smartphone Copy)
The printer allows you to make a copy using a camera on your smartphone/tablet (Smartphone Copy).
![]() Note
Note
-
For Smartphone Copy, install Canon PRINT Inkjet/SELPHY on your device and register the printer to it in advance.
For details on how to download Canon PRINT Inkjet/SELPHY, see below.
- Button names may differ depending on your smartphone/tablet.
-
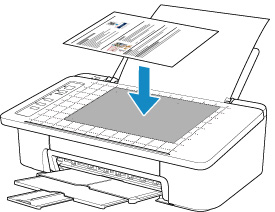
Load original on Smartphone Copy Grid.
 Important
- Load the original so that it does not protrude from Smartphone Copy Grid.
- The original may not be taken properly if it is warped, folded, or wrinkled. Get rid of wrinkles or flatten the original before taking a shot.
-
Start up
 (Canon PRINT Inkjet/SELPHY) on your smartphone/tablet.
 -
Select Smartphone Copy from main menu.
-
Take a shot of original using your smartphone/tablet.
Hold your smartphone/tablet horizontally to take a shot of original. Make sure you can see the whole of original on the screen.
The Perspective Correction screen appears and the Perspective Correction frame is set automatically.
 Note
Note- Depending on your smartphone/tablet, operation to confirm the image after shooting is necessary.
- The image may be rotate automatically depending on your smartphone/tablet.
-
Modify outer shape of image.
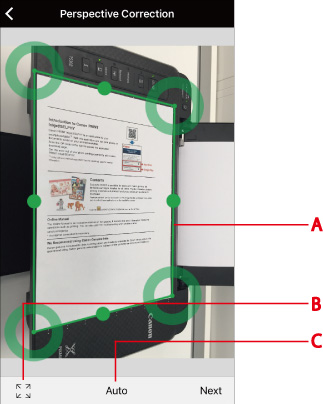
- (A) Perspective Correction frame
- Drag the frame to fit the outline of the original if the frame does not along with.
- (B) Perspective Correction frame switch
- Tap to display the Perspective Correction frame fully on the screen. Tap again to set to automatic setting mode.
- (C) Aspect ratio setting button
- Select from Auto, A4, or Letter. Auto is set as a default.
Note- If you are using iOS, you can load and modify the shape of a picture taken past.
-
Select Next.
The outer shape of the image is corrected automatically and the Image Correction screen appears.
-
Correct brightness and orientation of image.

- (D) Rotate
- Tap to rotate the image by 90 degrees. However, the image on the screen only rotates, it will not be reflected in the print result.
- (E) Brightness correction
- Select whether to correct image brightness automatically (
 ) or not (
 ).
).
-
Select Done.
The Document Print screen appears.
Note- Depending on your smartphone/tablet, the screen for setting the number of copies, paper size, paper type, etc. is displayed. In this case, proceed to step 12.
-
Select Next.
The Print Settings screen appears.
-
Print image from your smartphone/tablet.
-
Specify the number of copies, paper size, paper type, etc.
-
Select Print.
-
